As a community owner, prior to inviting suppliers into Connect you are able to assign requirements to your suppliers based on the location and product types and attributes that you have configured. When a supplier shares a product or location with you, if they select a product type or location type that has requirements associated to it, then they will see to-dos related to that product or location display on their supplier dashboard. NOTE: The community owner user will need to have business setup permission to be able to configure admin pages.
Steps to Assigning Document or Assessment Requirements
-
Go to the Admin page by clicking the cogwheel icon
 and navigate to the Business > Product or Location Setup > Product or Location Type.
-
You will see all the Product Types and Location Types in a table format. Click on the desired row to edit existing types or on the plus (+) to add a new Product Type or Location Type.

- Once you have clicked on the desired row, you will now see all the details for this product or location type. To add a requirement for this product or location type, scroll down to the requirement section and click on the add/edit requirement link to add a document or assessment requirement.

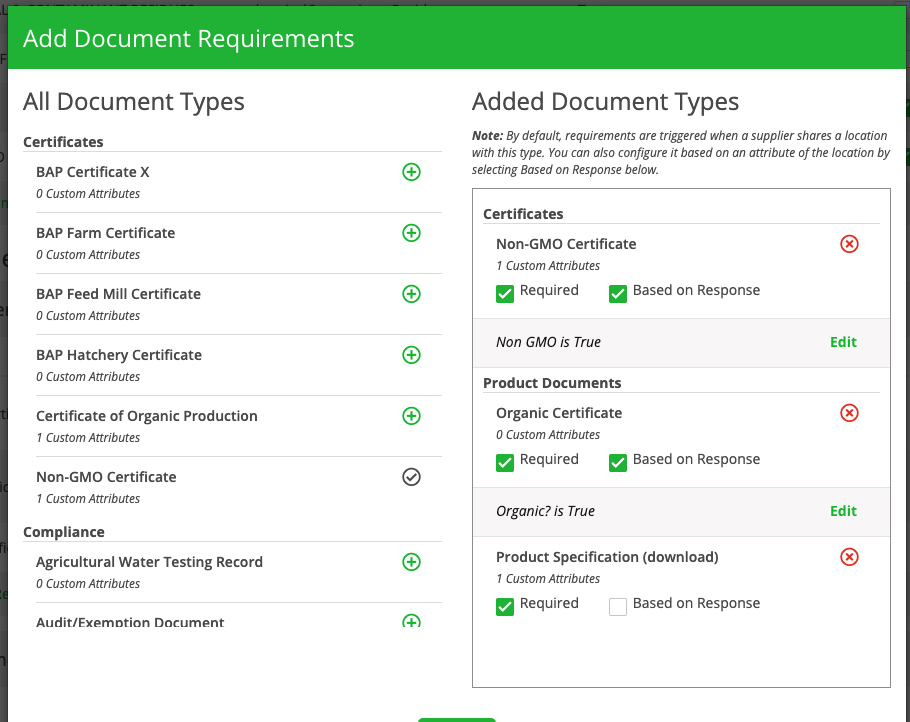
- Clicking on “Add/Edit Requirement” link will open a popup window with a list of all available document types and assessment templates.

- Add a document type or assessment template as a requirement by clicking the plus button next to each item. The selected document types or assessment templates will appear on the right, and the user will see two options “Required” and “Based on Response” checkboxes.
- The requirement will be set to optional by default. To make the requirement required simply check the “Required” checkbox.
 NOTE: Here's an example when you may wish to leave document requirements optional. Document type of "Third Party Audit - Corrective Actions" assigned as Optional requirement, since not all audits may have corrective actions, plus some audit schemes include corrective actions as a part of the "report", and there isn't a separate document to upload. Supplier can clear this if not relevant to them.
- To add an attribute-based conditional requirement by selecting “Based on Response” checkbox.

-
Upon selecting the checkbox, users can configure three additional fields.
- Is
- Is one of
- Is not one of
- If the conditional attribute is selection list, then the user can add multiple values for the condition.
- If the conditional attribute is a boolean attribute, then the user will see “Yes/No” as selectable value for setting up the conditional requirement.

- Choose Field is a dropdown field which will list all the default and custom boolean and selection list attributes.
- Operator field will show three values to choose from based on the attribute type selected in step 1.
- Value field will conditionally display values based on attribute type.
- You can click on the done button to collapse the based on response section. And you can see a preview of the attribute requirement that is set on a document or assessment.

- You can continue to edit them based on a response by clicking on “Edit”, which will show the expanded form of based on response section.

-
Upon selecting the checkbox, users can configure three additional fields.
- Click Save. Repeat as needed.
-
In order to remove the requirement click on the x button.
NOTE: Suppliers are NOT notified when requirements are added or removed from product or location types. Community owner will not be able to delete a custom attribute if there is a requirement against it. They will need to delete the requirement first.
- You will now see your requirements updated on the product type/location type details page.

- To-dos will be automatically generated on supplier dashboard asking them to complete the new requirement once suppliers add their product or locations. Suppliers will receive a weekly digest email regarding any open To-do items on Mondays.